A placeholder image
Smoke

How to make… a cold smoker

BASC member Joe Wood shares his step-by-step guide to building a simple but effective cold smoker that he now wouldn’t be without.

Making your own bespoke cold smoker is very rewarding

A cold smokerI’ve used mine to add flavour to all sorts – from venison and pheasant to pigeon and cheeses. Cold smoking flavours and preserves but doesn’t cook food. The food is placed away from the heat source so the smoke can cool before it reaches the item. The smoker temperature should be 30C or below for cold smoking.

All cold smoked food items need to be cooked before eating. Smoking meat or fish is more successful if a dry salt-based cure or wet brine is used beforehand. This also helps to add flavour, tenderises, and draws out impurities. The exception is cheese, butter and vegetables that cold smoke well but do not require salting beforehand.

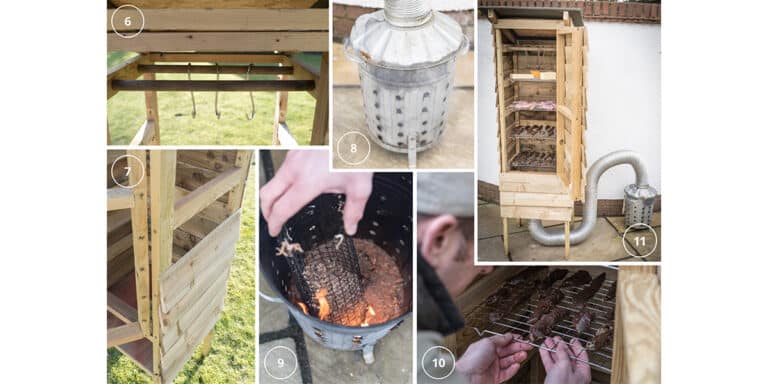
The three required elements to make a cold smoker are a firebox to create the smoke, some ducting to move and cool the smoke, and a chamber to contain the food and smoke. The design is only limited by your imagination and using recycled items can help to keep the cost down.

Hardwoods should be used for smoking and there are endless combinations. Fine sawdust, shavings or chips make the best material to provide a continuous flow of smoke without easily forming flames. Alder, cherry, apple, oak, hickory, beech or ash are all excellent choices to create unique flavour profiles.

The following step-by-step guide will, I hope, provide you with the detail necessary to have a go yourself…

What you need

  • Hand saw
  • Square
  • Drill
  • Spirit level
  • Tape measure and pencil
  • 50mm and 80mm general-purpose screws
  • 2mm x 25mm round head nails
  • 7 x 2.4m lengths of 50mm x 25mm roofing laths
  • 15 x 1.8m lengths of 125mm feather edge board
  • 460mm x 450mm 12mm plywood or OSB
  • 620mm x 660mm 12mm plywood or OSB
  • 2 x 65mm door hinges
  • 900mm x 900mm roofing felt
  • 2 x 410mm sections of broom handle
  • 4 x stainless steel cooling racks
    (450mm x 380mm racks were used here)
  • Small metal garden incinerator
  • 3m length of 100mm diameter semi-rigid flexible duct hose (must be heatproof)
  • 100mm diameter adjustable hose clip
  • 500mm x 500mm square of wire mesh (10mm x 10mm squares)

Step 1: Build the front and rear frames and the door

Cut four lengths of roofing lath – two (1650mm) for the front frame, two (1500mm) for the rear. Then join the lengths with 410mm horizontal bars. The width needs to match that of the cooling racks used; in this case the racks were 450mm wide and each section was 460mm wide. 

Place the bottom horizontal bars 650mm from the ground – this will provide the support for the bottom plate at Step 3. 

Cut two more lengths (950mm) for the door, then three 350mm horizontal bars. All joints need to be pre-drilled, to avoid splitting the sections, and screwed together.

Step 2: Join the front and rear frames

Cut four (350mm) horizontal bars. Pre-drill and screw to connect the front and rear frames together. 

Then cut two roof bars (660mm). Where they meet the rear frame, cut some rebates into the roof bars to provide an approximate angle of 600 for the slope of the roof (see image). Pre-drill and screw into place.

Step 3: Cut the bottom plate

Cut the bottom plate (460mm x 450mm) from the plywood or OSB. Each corner needs a 50mm x 25mm section cutting out of it to accommodate the vertical bars of the front and rear frames. 

Cut a hole in the centre of the plate to match the ducting used. The hole can be cut by drilling multiple connected smaller holes.

Step 4: Hang the door and add the rack bars

Use the door hinges to hang the door section inside the front frame. Cut six (350mm) horizontal bars and place at approximately 200mm intervals between the front and rear frames. Pre-drill and screw together. These will provide the supports for the cooling racks. Fit the bottom plate and screw into place.

Step 5: Fit the roof

Wrap the roofing felt around the plywood or OSB roof section and tack into place. Pre-drill and screw the roof section into place from underneath the roof bars. Ensure the screws do not penetrate the roofing felt.

Step 6: Cut and place the hanging bars

Fit the lengths of broom handle or similar bar. Pre-drill and screw between the top horizontal bars connecting the front and rear frames at equal intervals. These will serve as the bars from which to hang items in the smoker.

Step 7: Attach the cladding

Fit the lengths of broom handle or similar bar. Pre-drill and screw between the top horizontal bars connecting the front and rear frames at equal intervals. These will serve as the bars from which to hang items in the smoker.

Step 8: The firebox

Fit the ducting to the incinerator with a hose clip. Using a small incinerator is ideal as the lid can be removed easily. Pull the other end of the ducting through the hole in the base plate inside the smoker. Tack in place if required.

Step 9: The mesh cage

Make a 150mm diameter cylinder, with a height of roughly 300mm, with the mesh wire. This will hold the sawdust or woodchips to generate the smoke inside the firebox.

Step 10: Fit the racks

These can be tacked in place but are easier to clean if left removable.

Step 11: Fire up the smoker

Cut 12 lengths of 470mm feather edge board for the rear cladding. Cut 28 lengths of 450mm for the side sections. Cut three 500mm lengths for the section below the door. Cut nine lengths of 450mm for the door. 

The feather edge board should be attached to the frame with the thicker edge at the bottom and an overlap of 25mm per section. Mark with a pencil at 100mm intervals and ensure each board is level before attaching to the frames. Each section is tacked into place using the round head nails. 

The top boards of each run of cladding at the rear and sides will need cutting and adjusting to fit the roof profile or roof bars. 

A final 470mm length will be required above the door that should be cut 50mm short of the roof to provide an exit vent for the smoke.

And with that, your new smoker is ready to go!

Share